
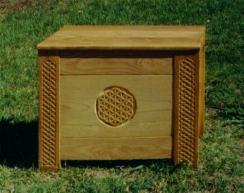
This box is the latest addition to the tourney gear we usually bring to events. It's not a strict reproduction of any particular box, but rather acombination of two styles. The first style, shown in Figure A (below, left) is a fifteenth-century gabled chest, was my inspiration for the carcass of my chest (although I used different carving patterns), but since I wished to use the chest as an extra seat in camp, I elected to make it with a flat top, like the thirteenth-century German chest shown in Figure B, on the right.
The dimensions were selected to accomodate five of the hurricane lamps we use in camp, with a depth sufficient to house the lamps without needing to remove their globes. There's also room enough to store a couple of bottles of lamp oil upright between the lamps. Feel free to modify these dimensions however you wish, but I'd keep the height at about 18" if you're going to use it for a seat.
| Fig. A: 15th c. gabled chest | Fig. B: 13th c. flat-top chest |
|---|---|
 |
 |
| Dr. Hermann Schmitz, The Encyclopedia of Furniture (Frederick A Praeger, NY 1957) Lib. of Congress #57-9791, p. 31 | Heinrich Kreisel, Die Kunst des deutsches Moebels (Erster Band -- Von den Anfaengen bus zum Hochbarock), Verlag C. H. Beck Muenchen 1968, p. 9 |
The chest is of oak, except for the carved panels on the center face and sides, which are of pine. (The theory was that it would be lighter and reduce the weight of the chest without sacrificing strength. I had also thought that the pine would be easier to carve, although its dryness and susceptibility to fracture turned out to present problems of its own.) It uses standard "one-inch" board (actually 3/4" thick) throughout. Because I happen to own a power planer, I planed down the pieces for the front and side panels another 1/8" or so, to let the legs stand out a tad more, but this was strictly for aesthetics and isn't necessary. The top is made of narrower boards glued up and doweled to achieve a width of 14" (the boards I happened to have on hand were about 5" wide, which is why the lid ended up with three panels. You could also use 8" stock and trim off the excess.)
In the plan of the front you see above, you see the various panels joined by dowels. On my chest, I used biscuit joinery for all the horizontal dowels (except for the dowels which attach the handle rail to the legs of the chest) but used dowels wherever vertical dowels are indicated. The pine center panels on the front, back, and sides are attached to the oak members above and below them by vertically aligned dowels as shown, but set in "dry" to allow the panels to expand and contract with respect to each other. All of the other joints were set in with aliphatic glue. I also used dowels to attach the positioning lugs on the bottom of the lid and to join the individual boards of the lid to each other.
If you examine the drawing above, you'll notice that there appear to be four panels in the sides, not three, but the top "panel" is actually the handle rail, which is partially obscuring the top side panel behind it. (If you're confused about this, look at the first plan again, and you'll see the relative position of the side panels and the handle rails indicated by dotted lines.) You'll also notice that the left side and right side of the drawing indicate dowels in different positions. The dowels on the left indicate where the side panel dowels go, and those on the right indicate where the handle rail dowels go.
I didn't note exactly where the dowels go because it's not important and I can't remember the dimensions anyway. Note that the side panels only get one dowel, because a panel that large is going to expand and contract quite a bit with humidity, and using a single dowel allows the center to remain fixed while the remaining wood can change dimension without stressing the legs unduly.
Of course, none of the dowels in the box carcase actually show. The holes in the legs that accept the dowels for the side panels and handle rails actually don't go all the way through, but stop about 1/8" short of the surface, so they'll be concealed. If you'd rather that the dowels show, you could simply drill the holes all the way through.
The above plan shows what the box should look like directly from above, again showing the relative positions of the side panels and the handle rails.
This shows the underside of the lid, showing the guide posts that fit between the side panels and handle rails and keep the lid from sliding off. These are held in place with dowels ... the only ones on the chest whose ends show (at least the lower ends -- the top ends don't go through the seat.). You could also fasten the guides with screws. To position these, it's easiest to put the lid on your workbench or floor or whatever, and set the chest n top of it, upside down. Then trace the void between the side panels and the handle rails, indicating where the legs close off the end of the slot. Your traced lines will show where the guide posts go. Or you can use hinges instead. (I'm partial to the former setup because you can remove the lid without having to clear it off, but suit yourself.)
The bottom of the chest isn't shown. The easiest way is to cut a piece of 1/4" plywood 11.5" by 19.5" (the interior size of the chest). Next, cut some moulding of a size to fit around the inside of the box at the bottom, and glue and nail the molding into place. Your plywood will sit on the molding. Since I wanted to avoid nails and plywood, I used a different approach: I made my bottom panels by planing down some pine board to three-eighths of an inch thick (you gotta love that power planer!) and cutting them to cover an area 12" by 20", exactly 1/2" wider and longer than the interior area of the chest. Next, I cut grooves 1/4" deep and 3/8" wide into the insides of the bottom panels using a table saw. The groove was 1/2" from the bottom edges of the panels. (A dado bit wasn't necessary, since it was easy to make an initial cut on all four pieces, and then move the fence a wee bit and re-cut the grooves to the proper width.) I also cut a similar groove, using hand tools, into each of the legs, to extend the front panel grooves. This is most easily done when the front and back of the chest have been pre-assembled and you can extend the groove to the point where the side panels will join the leg panels. After the grooves have been cut, the side panel assemblies (fitted together dry, as explained above) are glued to the front assembly. The bottom boards are then slid into their grooves, and the back panel fitted. Again, I didn't use any glue on the bottom boards, since I figured they'd be happier if they were free to expand and contract as they pleased. Even if they shrink a little, they'll be tight enough.